Japanese Strawberry Sponge Cake Recipe delivers a cloud-light sponge with fresh strawberries and barely sweet whipped cream. It suits anyone who loves elegant, not-too-sweet desserts, and the total time runs about 2 hours 30 minutes from start to slice. I baked this for my mom's spring birthday, and she claimed dibs on the biggest piece.
Why Japanese Strawberry Sponge Cake Recipe Is Worth It
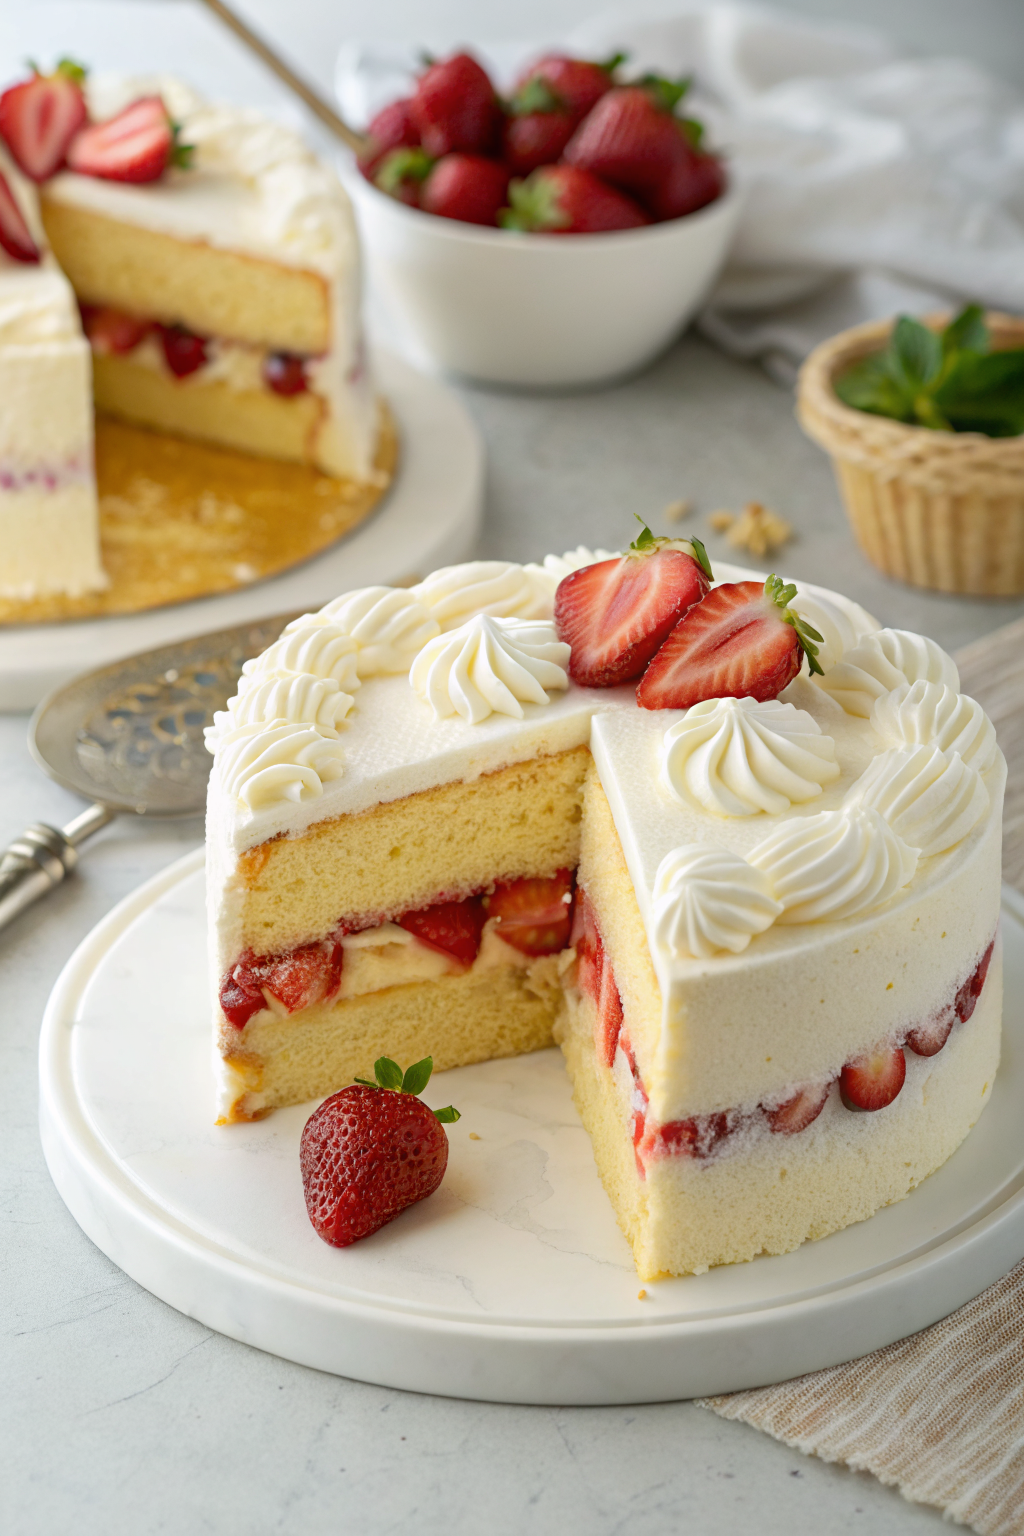
Japanese Strawberry Sponge Cake Recipe gives you an airy genoise-style sponge, softly sweet whipped cream, and bright berries in every bite. The texture feels soft and springy, the flavor stays clean, and the whole cake looks like a little celebration on a plate.
So fluffy, not overly sweet, and the strawberries shine with every forkful ★★★★★
Ingredients You Need
Sponge
- 4 large eggs, room temp
- 120 g granulated sugar
- 120 g cake flour, sifted twice (I like King Arthur or Swans Down; sub all-purpose by removing 2 tbsp per cup and replacing with cornstarch)
- 30 g unsalted butter, melted and warm
- 30 g whole milk, warm
- 1 tsp vanilla extract
- Pinch fine sea salt
Notes:
- Warm milk and butter blend into the batter more easily. Cold fat knocks out the foam.
- Use a scale for accuracy. Japanese sponge rewards precision.
Simple Syrup
- 60 ml water
- 30 g granulated sugar
- 1 tsp kirsch, rum, or vanilla, optional
Shortcut:
- Use store-bought simple syrup if you keep it in the fridge.
Whipped Cream and Filling
- 480 ml heavy cream 36 to 40 percent, very cold
- 50 to 70 g powdered sugar, to taste
- 1 tsp vanilla extract
- 300 to 400 g ripe strawberries, hulled and sliced for the center, plus extra whole or halved berries for the top
Brand note:
- Look for cream labeled “heavy whipping cream.” Trader Joe’s and Organic Valley whip well.
Stabilizer option:
- 1 tsp powdered gelatin bloomed in 1 tbsp cold water, then melted and cooled, if you need longer hold.
Equipment
- Two 7-inch round cake pans, or two 8-inch pans for a slightly wider cake
- Parchment rounds
- Stand mixer or hand mixer
- Mixing bowls, fine-mesh sieve
- Kitchen scale
- Offset spatula, bench scraper, and serrated knife
- Pastry brush
- Cake turntable and acetate strip, optional
Quick Tips & substitutions
- Weigh ingredients for consistent height and crumb.
- Warm eggs to lukewarm before whipping so the foam builds faster.
- Whip to full ribbon stage; the batter should fall in thick ribbons that sit on the surface for 3 to 5 seconds.
- Sift cake flour two times and fold gently in three additions to protect the air you just whipped.
- Temper the warm milk and butter with a scoop of batter, then fold it back in so the foam stays lofty.
- Line pans with parchment and skip greasing the sides so the sponge can climb.
- Pop large bubbles by running a skewer through the batter and tapping the pans once on the counter.
- Bake on the center rack for even rise.
- Use kirsch or vanilla in the syrup to boost strawberry flavor.
- Stabilize the cream with a little gelatin if the cake needs to hold for hours in warm rooms.
- Swap strawberries with raspberries or peaches when they look best at the market.
How to Make Japanese Strawberry Sponge Cake Recipe
Prep the pans and ingredients
- Preheat oven to 340°F or 170°C. Line the bottoms of the pans with parchment.
- Warm milk and melted butter so both feel pleasantly warm, not hot.
- Set eggs in warm water for 5 minutes if they feel cold.
Whip the egg mixture to ribbon
- Combine eggs, sugar, salt, and vanilla in a bowl set over barely simmering water and whisk until the mixture reaches 100 to 110°F.
- Move to the mixer and whip on high until tripled in volume and very pale, about 6 to 8 minutes.
- Check ribbon stage: lift the whisk and let batter fall; the trail should sit on top for a few seconds.
Fold and bake the sponge
- Sift cake flour over the batter in three additions and fold gently with a spatula until no dry spots remain.
- Stir together warm milk and butter with a scoop of batter, then fold this enriched mixture back into the bowl.
- Divide batter evenly between pans, run a skewer through to release bubbles, and bake 18 to 22 minutes until the tops spring back and a toothpick comes out clean.
Cool and slice the layers
- Cool cakes in pans for 5 minutes. Run a thin knife around the sides, turn out onto a rack, peel off parchment, and set right side up.
- Let cool completely. If you want extra height with thinner cream layers, split each cake into two with a serrated knife.
Whip the cream
- Chill bowl and whisk. Beat cream on medium until it looks thick and soft.
- Add powdered sugar and vanilla, then beat to medium-firm peaks. If using gelatin, stream in the cooled liquid as the mixer runs and finish whipping.
Assemble the cake
- Make the syrup by heating water and sugar until dissolved, then cool and add kirsch or vanilla.
- Set one layer on a board. Brush with syrup, spread a generous layer of cream, and shingle sliced strawberries across the surface.
- Add more cream to cover the fruit. Top with the second layer and press lightly.
- Apply a thin crumb coat of cream over the top and sides and chill 15 minutes.
Chill and finish
- Frost the cake with a smooth final coat. Pipe rosettes or swoops if you like.
- Crown the top with halved or whole strawberries. Chill 30 to 60 minutes before slicing with a hot, dry knife.
Variations
- Matcha shortcake: whisk 2 tsp matcha with the flour and reduce flour by the same weight for a gentle green tea note.
- Chocolate sponge: add 2 tbsp Dutch-process cocoa and reduce flour by the same amount.
- Yuzu or citrus twist: swap kirsch with yuzu juice or lemon juice in the syrup for a bright finish.
- Mixed berries: layer raspberries and blueberries with strawberries for extra color.
- Individual minis: bake the sponge in a sheet pan, punch out rounds, and stack petite shortcakes in ring molds.
Ways to Serve
- Dust the top with a little powdered sugar and add a ring of sliced berries.
- Pair with hot green tea, iced matcha latte, or black coffee.
- Spoon a little macerated strawberry syrup around the slice.
- Add birthday candles and a quick vanilla bean scrape over the top for aroma.
Storage
Cover the finished cake and refrigerate it for up to 36 hours; the syrup keeps the sponge soft. Slice just before serving to keep the cut edges neat. For longer storage, wrap the cooled unfrosted sponges tightly and freeze for up to 2 months, then thaw in the fridge before assembly. Avoid freezing the fully frosted cake, since whipped cream can weep after thawing.
Japanese Strawberry Sponge Cake Recipe
Ingredients
Instructions
- Preheat the oven to 340°F (170°C). Line the bottoms of two 7-inch (or two 8-inch) round cake pans with parchment rounds.
- Warm the milk and melted butter until pleasantly warm but not hot.
- If the eggs are cold, place them in warm water for about 5 minutes to bring them to lukewarm.
- Combine the eggs, granulated sugar, salt, and vanilla in a heatproof bowl set over barely simmering water.
- Whisk constantly until the mixture reaches about 100–110°F (just warm to the touch).
- Transfer the bowl to a stand mixer or use a hand mixer and whip on high speed until the mixture is very pale, tripled in volume, and falls in thick ribbons, about 6–8 minutes.
- Check the ribbon stage by lifting the whisk and letting the batter fall; the trail should sit on the surface for 3–5 seconds before disappearing.
- Sift the cake flour over the egg mixture in three additions, gently folding with a spatula after each addition just until no dry flour remains.
- In a separate small bowl, stir together the warm milk and melted butter, then blend in a scoop of the batter to lighten the mixture.
- Gently fold this enriched mixture back into the main batter, taking care not to deflate the foam.
- Divide the batter evenly between the prepared pans. Run a skewer through each pan to release large air bubbles, then tap the pans once on the counter.
- Bake on the center rack for 18–22 minutes, or until the tops spring back when lightly pressed and a toothpick inserted in the center comes out clean.
- Let the cakes cool in the pans for 5 minutes, then run a thin knife around the sides to loosen.
- Turn the cakes out onto a wire rack, peel off the parchment, and set them right side up to cool completely.
- For extra height and thinner cream layers, carefully split each cooled cake into two even layers with a serrated knife, if desired.
- Chill the mixing bowl and whisk. Pour in the cold heavy cream and whip on medium speed until it thickens and forms soft peaks.
- Add the powdered sugar and vanilla, then continue whipping to medium-firm peaks.
- If using gelatin to stabilize, stream the cooled melted gelatin into the cream while the mixer runs on low, then finish whipping just until the cream holds its shape.
- In a small saucepan, combine the water and granulated sugar. Heat gently, stirring, until the sugar is fully dissolved.
- Remove from heat and let cool to room temperature, then stir in kirsch, rum, or vanilla if using.
- Place the first cake layer on a serving board or cake plate. Lightly brush the surface with simple syrup.
- Spread a generous layer of whipped cream over the cake, then arrange sliced strawberries evenly on top.
- Cover the strawberries with more whipped cream to fill in the gaps and level the surface.
- Top with the second cake layer and press gently to set. If you have more layers, repeat the syrup, cream, and berries.
- Apply a thin crumb coat of whipped cream over the top and sides of the cake and chill for about 15 minutes to set.
- Frost the cake with a smooth final coat of whipped cream, using an offset spatula or bench scraper to even the sides.
- Pipe rosettes or swoops of cream on top if you like, then decorate with whole or halved strawberries.
- Chill the finished cake for 30–60 minutes before slicing with a hot, dry knife for the cleanest cuts.
Notes
Approximate per serving (1/12 of cake): 290–320 calories; fat 19–21 g; saturated fat 11–12 g; carbohydrates 26–30 g; fiber 1 g; sugars 19–22 g; protein 5–6 g; sodium 60–90 mg. Values will vary based on exact ingredient brands, strawberry amount, and portion size.