
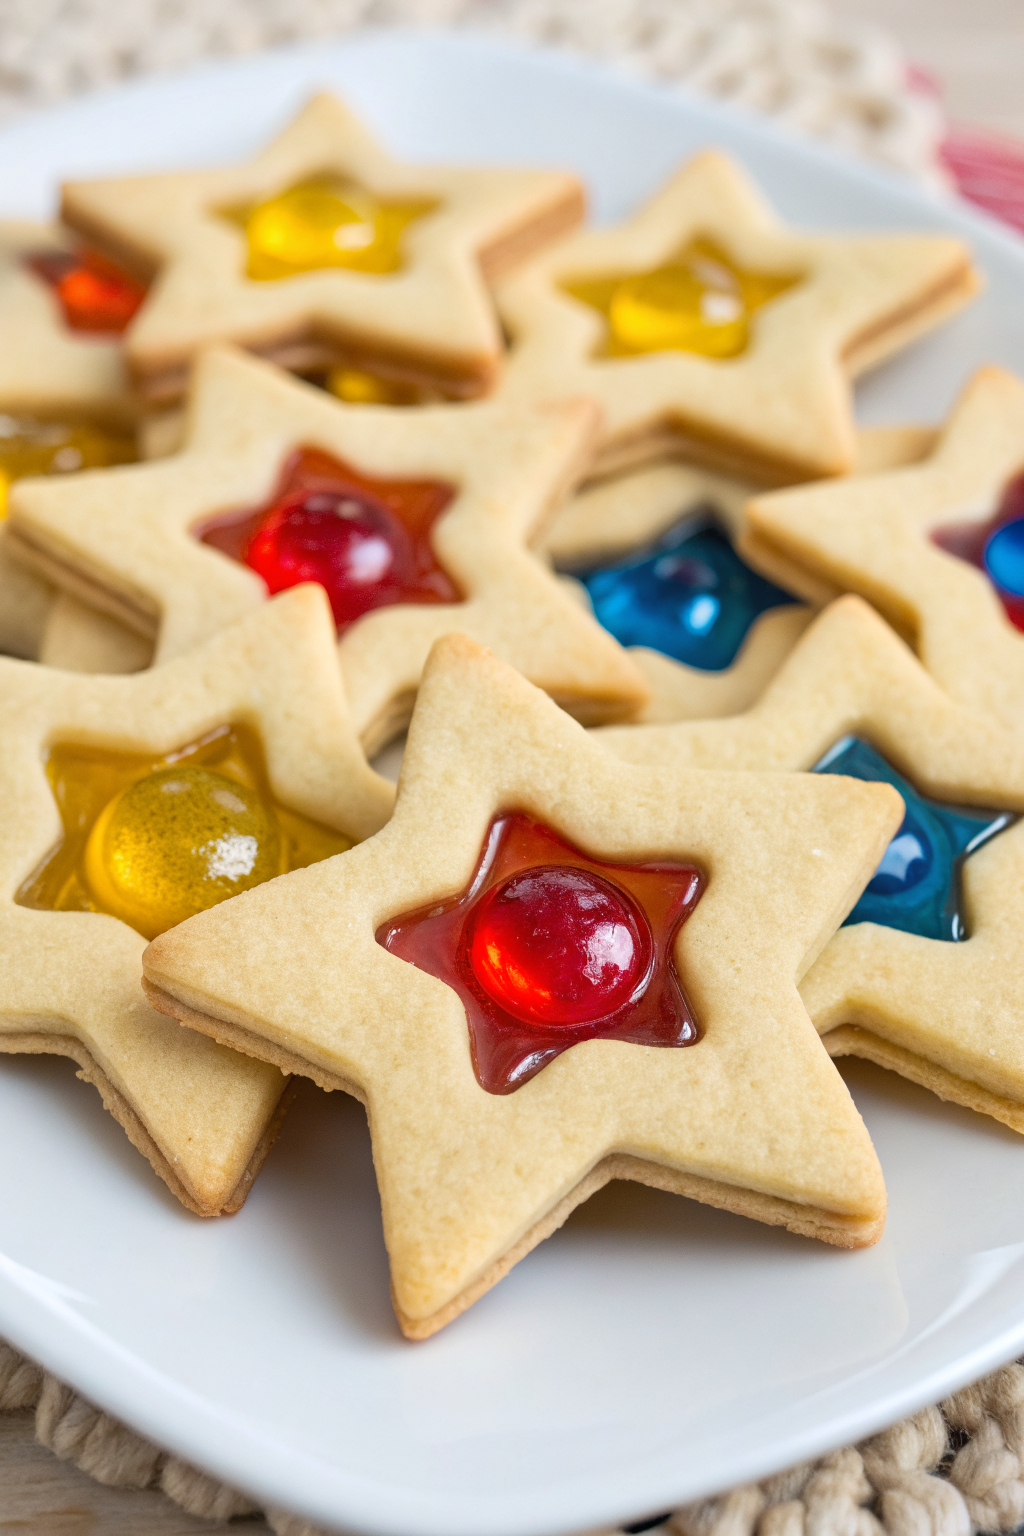
Easy Stained Glass Cookies Recipe delivers crisp, buttery sugar cookies with jewel-toned candy windows that sparkle and taste fruity-sweet. This batch fits holiday bakers, school parties, and cookie swaps, and you can finish it in about 1 hour 15 minutes including chill time. I baked my first set during a snow day and felt like a kid again.
Why Choose This Easy Stained Glass Cookies Recipe
Easy Stained Glass Cookies Recipe gives you sturdy cutouts with neat edges and vivid candy centers that actually hold their shape. The dough rolls cleanly, the windows melt evenly, and the cookies keep a tender bite without turning brittle. You get bakery-level results without fancy tools.
I tested different candies, baking mats, and dough ratios so you do not have to. You can switch flavors and colors with a quick candy swap, and the method stays the same. Kids love to sort colors, and adults love the crunch.
These windowpane cookies looked like tiny ornaments and vanished faster than the hot cocoa at my party ★★★★★
Ingredients You Need
- 3/4 cup unsalted butter, softened (use a good-quality stick butter for best flavor)
- 3/4 cup granulated sugar
- 1 large egg
- 1.5 teaspoons pure vanilla extract (add 1/4 teaspoon almond extract if you like)
- 2.5 cups all-purpose flour, spooned and leveled
- 1/2 teaspoon fine salt
- 1 to 2 teaspoons milk, only if the dough seems dry
- 20 to 30 translucent hard candies, assorted colors and flavors (Jolly Ranchers, Life Savers, Dum Dums without wrappers; sort by color)
Pantry shortcuts and swaps:
- Use a 1:1 gluten-free flour blend in place of all-purpose flour if needed.
- Swap half the vanilla for lemon extract or add 1 teaspoon citrus zest for brightness.
- If you only have salted butter, reduce the added salt to a pinch.
Equipment:
- Mixing bowl and hand mixer or a stand mixer with paddle
- Rolling pin
- Parchment paper lined baking sheets
- Two cookie cutters per shape: one larger, one smaller to cut the window
- Zip-top bags and a mallet or a small food processor to crush candy
- Small spoon, offset spatula, and wire racks
- Drinking straw if you plan to add ribbon holes
How to Make Easy Stained Glass Cookies Recipe
Make the dough
- Beat butter and sugar on medium speed until creamy and smooth, about 2 minutes.
- Mix in egg and vanilla until combined.
- Add flour and salt, then mix on low until a soft dough forms. If it looks crumbly, add milk a teaspoon at a time until it holds together.
- Split dough into two discs, wrap, and chill for 30 to 45 minutes.
Prep the candy
- Sort candies by color.
- Place candies in separate zip-top bags and crush into small shards, about lentil size. Keep colors separate to avoid muddy windows.
Roll and cut
- Heat oven to 350°F (175°C). Line baking sheets with parchment.
- Lightly flour your surface or roll between two sheets of parchment. Roll dough to about 1/4 inch thick.
- Cut large shapes and move them to the lined sheets. Cut a smaller shape inside each cookie to make a window and remove the center. Reroll scraps once.
Fill the windows
- Spoon crushed candy into each cutout window until it barely fills the space, about 1 to 2 teaspoons depending on size. Keep candy inside the edges.
- If you want hanging cookies, punch a small hole near the top with a straw.
Bake and cool
- Bake one sheet at a time for 8 to 10 minutes. The edges should look set, and the candy should melt and look glossy.
- Pull the sheet from the oven and let the cookies cool on the pan until the candy firms up, about 10 to 12 minutes.
- Move cookies to a rack to finish cooling. Thread ribbon through ornament holes after they cool fully.
Tips & Common Mistakes
- Chill the dough long enough so cutters stamp clean edges and cookies keep their shape.
- Roll evenly to 1/4 inch so the candy melts fully before the edges brown.
- Use parchment, not wax paper or silicone mats, for the cleanest release.
- Crush candy into small bits so it melts evenly and does not leave sharp chunks.
- Do not overfill the windows or the candy will bubble over the edges.
- Keep candy inside the cutout; stray pieces on the dough will stain the cookie surface.
- Bake one sheet at a time on the center rack for consistent heat.
- Pop any big bubbles in the melted candy right out of the oven with a toothpick, then let it set.
- Avoid too much leavener; it puffs the dough and warps the window.
- If the room runs warm, chill cut cookies on the sheet for 10 minutes before baking.
Variations I've Tried
- Citrus spark: add 1 teaspoon lemon or orange zest to the dough and use lemon or orange candies.
- Spiced sugar cookie: mix in 1 teaspoon cinnamon and a pinch of ginger.
- Cocoa cutouts: replace 2 tablespoons flour with cocoa powder for a chocolate base.
- Almond bakery style: swap half the vanilla for almond extract and use cherry or strawberry candies.
- Gluten-free: use a 1:1 gluten-free baking blend and chill a bit longer before rolling.
- Ornament set: cut stars, trees, and snowflakes, then add ribbon holes and hang in a window.
How to Serve
Set these stained glass cookies on a platter where the light can catch the centers. Pair them with hot cocoa, coffee, or a mug of chai for a cozy contrast to the fruity candy. For parties, keep colors grouped so the tray looks like a candy shop window. If you pack them as gifts, separate layers with parchment to protect the windows.
Make-Ahead and Storage
Mix the dough up to 3 days ahead and keep it chilled. You can also freeze the dough discs for up to 2 months; thaw overnight in the fridge before rolling.
Store baked cookies in an airtight tin at room temperature for up to 5 days with parchment between layers. Avoid humid spots, which can make the candy tacky. To refresh the texture, warm cookies on a parchment-lined sheet in a 250°F oven for 3 to 4 minutes, then cool on the pan before stacking. I keep silica packets near the tin, not inside with the cookies, and the windows stay snappy.
Easy Stained Glass Cookies Recipe
Ingredients
Instructions
- Beat the butter and sugar together on medium speed until creamy and smooth, about 2 minutes.
- Mix in the egg and vanilla extract until fully combined.
- Add the flour and salt, then mix on low speed until a soft dough forms. If the dough looks crumbly, add milk 1 teaspoon at a time just until it holds together.
- Divide the dough into two discs, wrap each in plastic, and chill for 30 to 45 minutes until firm enough to roll.
- Sort the hard candies by color.
- Place each color in a separate zip-top bag and crush into small shards about the size of lentils, using a mallet or rolling pin. Keep colors separate so they do not mix and muddy in the oven.
- Preheat the oven to 350°F (175°C). Line baking sheets with parchment paper.
- Lightly flour your work surface, or roll the dough between two sheets of parchment. Roll one disc of dough at a time to about 1/4 inch thickness.
- Use larger cookie cutters to cut out shapes and transfer them carefully to the prepared baking sheets.
- Use a smaller cutter to cut a window from the center of each cookie, removing the dough from the middle. Gather and reroll scraps once if needed.
- Spoon the crushed candy into each cutout window so it just fills the space, about 1 to 2 teaspoons per cookie depending on the size. Keep the candy inside the cut edges of the dough.
- If you want to hang the cookies as ornaments, use a drinking straw to punch a small hole near the top of each cookie.
- Bake one sheet at a time on the center rack for 8 to 10 minutes, or until the cookie edges look set and the candy has melted and looks glossy.
- Remove the baking sheet from the oven and let the cookies cool on the pan until the candy centers firm up, about 10 to 12 minutes.
- Carefully transfer the cookies to a wire rack to cool completely. If you made ornament holes, thread ribbon through once the cookies are fully cooled and the candy is hard.
Notes
Approximate per 1 cookie (about 24 cookies total): 140 calories; fat 6 g; saturated fat 4 g; carbohydrates 21 g; fiber 0 g; sugars 12 g; protein 2 g; sodium 65 mg. Values will vary based on exact size, candy brand, and portion. Storage: Store in an airtight container at room temperature for up to 5 days with parchment between layers to protect the candy windows. Avoid humid areas, which can make the candy tacky.