
Red Velvet Cake Pops Recipe packs cocoa-kissed cake with tangy cream cheese frosting and a snappy chocolate shell in one perfect bite. This suits bake-sale heroes, party hosts, and Valentine gifters, and you can finish it in about 2 hours including chill time. I learned the hard way that warm pops and a hot coffee cuddle too much, so I keep the mug across the room.
Why Red Velvet Cake Pops Recipe Is Worth It
Red Velvet Cake Pops Recipe delivers big bakery flair with simple steps and pantry-friendly shortcuts. You get rich red velvet flavor, creamy tang inside, and a shiny candy melt coat that holds up on a stick.
These cake pops also travel well, portion cleanly, and invite fun decorations. Kids cheer for sprinkles while adults call dibs on the ones with a white chocolate drizzle.
The pops tasted like mini slices of classic red velvet with a smooth crack of chocolate on the outside and a soft, tangy center inside, and the whole box vanished at our party in minutes ★★★★★
Ingredients You Need
- Red velvet cake
- 1 box red velvet cake mix, 15.25 ounces, plus eggs, oil, and water as the label directs, or use one 9 by 13 pan of homemade red velvet cake
- Brand notes: Duncan Hines and Betty Crocker bake consistently and crumble well
- Cream cheese frosting
- 1/3 to 1/2 cup, room temperature
- Shortcut: use canned cream cheese frosting like Pillsbury if you want speed
- Homemade option: beat 4 ounces cream cheese, 2 tablespoons unsalted butter, 1 cup powdered sugar, and 1/2 teaspoon vanilla until smooth
- Candy coating
- 16 ounces candy melts or chocolate wafers, any color you like
- Smooth melt picks: Ghirardelli melting wafers or Merckens
- If you use chopped chocolate, add 2 teaspoons refined coconut oil to thin
- Extras
- 1 to 2 teaspoons vegetable shortening or coconut oil to thin thick melts
- Sprinkles, crushed freeze-dried raspberries, or red velvet crumbs for garnish
- Gel red food color, optional, to boost red tones in the crumb if needed
- Pinch of fine salt to balance sweetness
- Lollipop sticks
- 4 to 6 inch sticks, about 24 to 36 pieces, depending on pop size
Equipment:
- 9 by 13 pan, mixing bowls, and spatula
- Stand mixer or hand mixer, optional but helpful
- Baking sheet lined with parchment
- Cookie scoop, 1 tablespoon size, for even pops
- Microwave-safe bowl or double boiler
- Styrofoam block or a drying rack with holes to hold pops upright
- Kitchen scale, optional, for exact pop size
Quick Tips & substitutions
- Chill the cake before crumbling if it feels sticky, then rub it between your palms for fine crumbs.
- Add frosting a tablespoon at a time, and stop when the mixture holds together like play dough.
- Use a cookie scoop for uniform pops, then roll with light pressure so you keep a round shape.
- Dip the stick tip in melted coating before you insert it to anchor the pop.
- Thin thick melts with 1 teaspoon oil at a time, and stir until smooth and fluid.
- Keep pops cold but not frozen when you dip, or the coating may crack.
- Fix cracks with a second quick dip or by brushing on a thin coat with a spoon.
- No cream cheese on hand? Use vanilla frosting and add 1 teaspoon white vinegar for tang.
- Gluten-free works well with a gluten-free red velvet mix and the same method.
- Dairy-free version: use vegan red velvet cake, dairy-free frosting, and dark chocolate with coconut oil.
How to Make Red Velvet Cake Pops Recipe
Step 1: Bake the cake
- Heat the oven and bake the red velvet cake as the box or recipe directs.
- Cool the cake completely, at least 60 minutes, so the crumbs hold together.
Step 2: Crumble the cake
- Break the cake into a large bowl and rub it into fine crumbs.
- Add a pinch of salt and stir.
Step 3: Mix with frosting
- Add 1/3 cup frosting and mix with a spatula or your hands.
- Pinch a bit and squeeze it. If it cracks, add 1 tablespoon more frosting and mix. Stop when it feels like soft clay that holds a ball.
Step 4: Roll and chill
- Scoop 1 tablespoon portions, about 20 to 30 grams each, and roll them into smooth balls.
- Place on a parchment-lined sheet and chill 20 to 30 minutes, until firm.
Step 5: Insert sticks
- Melt 2 tablespoons of candy coating.
- Dip 1/2 inch of each stick into the coating and insert it halfway into each ball. Chill 10 minutes.
Step 6: Melt the coating
- Place the coating in a microwave-safe bowl and heat in 20 to 30 second bursts, stirring between each, until smooth.
- Thin with 1 to 2 teaspoons oil if needed. Aim for a consistency like warm yogurt.
Step 7: Dip and decorate
- Hold a pop by the stick and dip it straight down, then pull it straight up. Tilt and twirl to coat fully.
- Tap your wrist gently to shake off extra coating. Add sprinkles right away before it sets.
- Stick each pop into a Styrofoam block to dry. Repeat with the rest.
Step 8: Set and serve
- Let the coating set at room temperature 20 to 30 minutes, or chill 10 minutes.
- Drizzle with a second color if you like, then serve.
Variations
- White chocolate shell with a red velvet crumb dust on top.
- Dark chocolate shell with micro-planed chocolate curls.
- Heart shapes for Valentine’s Day, then dip and add red sugar.
- Cheesecake twist: swap half the frosting for plain cream cheese, beaten smooth.
- Peppermint finish: stir 1/4 teaspoon peppermint extract into the coating and top with crushed candy canes.
- Funfetti pop: mix 2 tablespoons rainbow sprinkles into the cake mixture before rolling.
Ways to Serve
- Box a dozen pops in mini liners for gifts.
- Set them in a Styrofoam block wrapped in tissue for a dessert bouquet.
- Add them to a dessert board with strawberries and chocolate-dipped pretzels.
- Pair with coffee, milk, or a small glass of ruby port for a rich match.
Storage
Store finished cake pops in an airtight container at room temperature for up to 3 days if you used a shelf-stable frosting. If you used frosting with fresh cream cheese or butter, refrigerate the pops for up to 1 week and bring them to room temp before serving. Freeze undipped balls for up to 2 months, then thaw in the fridge and dip fresh coating. Keep moisture away from the coating to avoid bloom, and add a paper towel in the container to catch condensation.
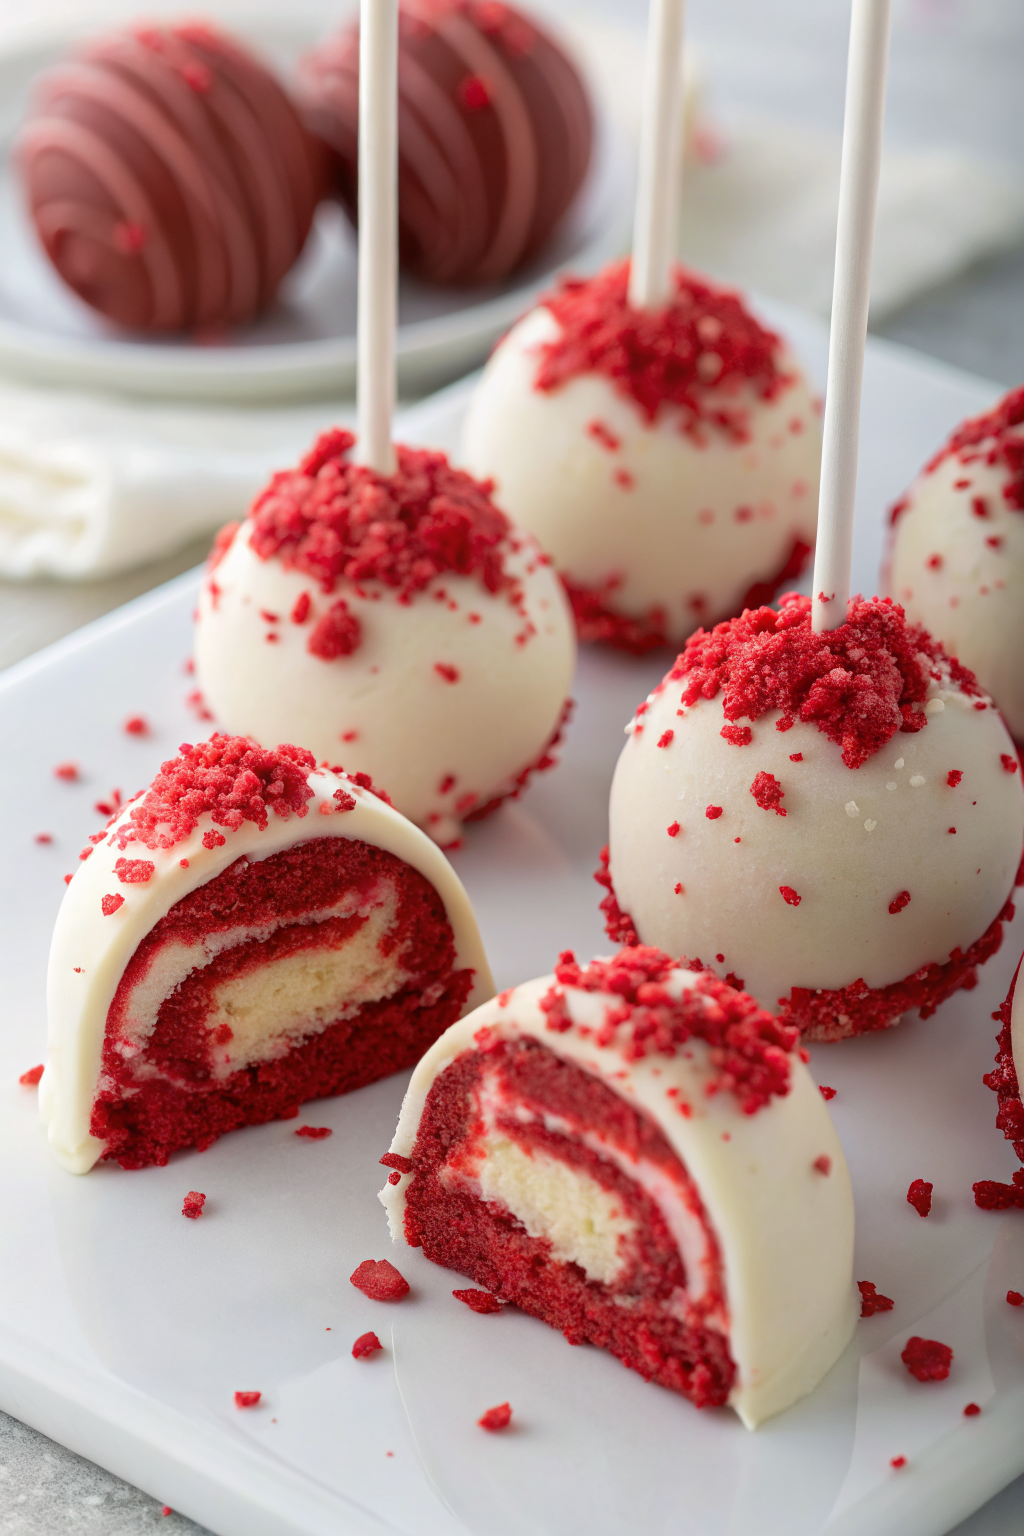
Red Velvet Cake Pops Recipe
Ingredients
Instructions
- Bake the red velvet cake according to the box or your homemade recipe instructions in a 9x13-inch pan. Cool completely, at least 60 minutes.
- If making homemade cream cheese frosting, beat the cream cheese and butter until smooth, then mix in powdered sugar and vanilla until creamy.
- Crumble the cooled cake into a large bowl, breaking it into fine, even crumbs. Add a pinch of fine salt and stir to distribute.
- Add 1/3 cup cream cheese frosting to the crumbs and mix with a spatula or your hands. Test by pinching some mixture: if it cracks, add more frosting 1 tablespoon at a time until it feels like soft clay and holds a smooth ball.
- Scoop about 1 tablespoon portions (20–30 g) of the mixture and roll them into smooth, even balls. Place on a parchment-lined baking sheet and chill for 20–30 minutes, until firm.
- Melt about 2 tablespoons of the candy coating in a small microwave-safe bowl until smooth. Dip 1/2 inch of each lollipop stick into the melted coating, then insert the stick halfway into each cake ball. Chill for 10 minutes to set.
- Melt the remaining candy coating in a microwave-safe bowl, heating in 20–30 second bursts and stirring between each until smooth. If too thick, thin with 1–2 teaspoons shortening or coconut oil until it flows like warm yogurt.
- Working with a few pops at a time, hold each pop by the stick and dip it straight down into the melted coating, then lift it straight up. Tilt and twirl gently to fully cover. Tap your wrist lightly to shake off excess coating.
- Immediately add sprinkles or other toppings before the coating sets, then place each pop upright in a Styrofoam block or stand to dry. Repeat with remaining pops.
- Let the coating set at room temperature for 20–30 minutes or chill for about 10 minutes until firm. Drizzle with an additional color of melted coating if desired, then serve.
Notes
Approximate per 1 cake pop (1 of 24): 190 calories; fat 11 g; saturated fat 6 g; carbohydrates 22 g; fiber 0 g; sugars 17 g; protein 2 g; sodium 190 mg. Values will vary based on cake mix brand, frosting type, chocolate used, and exact pop size. Storage: Store pops made with shelf-stable frosting in an airtight container at room temperature for up to 3 days. If using frosting with fresh cream cheese or butter, refrigerate up to 1 week and bring to room temperature before serving. Undipped cake balls can be frozen up to 2 months; thaw in the refrigerator before coating.